In this guide, you’ll learn how to host a statically exported Next.js 15 app on AWS S3 and serve it via CloudFront—fully automated using GitHub Actions.
Prerequisites
-
GitHub account and repository
-
A working Next.js 15 app
-
AWS account with:
- An S3 bucket
- A CloudFront distribution -An IAM user with the right permissions
What is Next.js Static Export?
Next.js static export enables you to pre-render your app into static HTML files. Using static export in Next.js generates pre-rendered HTML files for each page during build time.
Without static export, pages are typically server-side rendered, meaning HTML is generated on-the-fly for each request.
For experienced users, skip to the deployment section.
To create static pages with Nextjs you’ll need to configure the next.config.mjs as follows:
import type { NextConfig } from "next";

const nextConfig: NextConfig = {
  output: "export",
  trailingSlash: false,
  //...
};

export default nextConfig;
Configure S3 bucket
Set the name for the bucket as the domain name - not mandatory, but it’s useful when you have multiple sites to run and manage.
Bucket Settings:
-
Block all public access(Permission Tab) -
Create a policy to only allow access to bucket from CloudFront:
{
"Version": "2008-10-17",
"Id": "PolicyForCloudFrontPrivateContent",
"Statement": [
    {
        "Sid": "AllowCloudFrontServicePrincipal",
        "Effect": "Allow",
        "Principal": {
            "Service": "cloudfront.amazonaws.com"
        },
        "Action": "s3:GetObject",
        "Resource": "arn:aws:s3:::$BUCKET_NAME/*",
        "Condition": {
            "StringEquals": {
                "AWS:SourceArn": "arn:aws:cloudfront::$DISTRIBUTION"
            }
        }
    }
]}
Do not enable Static website hosting if you’re using OAC (Origin Access Control). Instead, keep the bucket private and allow access via CloudFront only.
Configure CloudFront Distribution
Amazon CloudFront is a content delivery network (CDN). CloudFront accelerates the delivery of static and dynamic web content by caching it at numerous edge locations worldwide.
Create a distribution, generate also a SSL Certificate to have HTTPS for your site.
Create an Origin as follows:
- For origin domain : choose your bucket.
- Origin path: leave empty
- Origin Access: Use
Origin access control settings (recommended) - Create new OAC:
Sign requests (recommended)
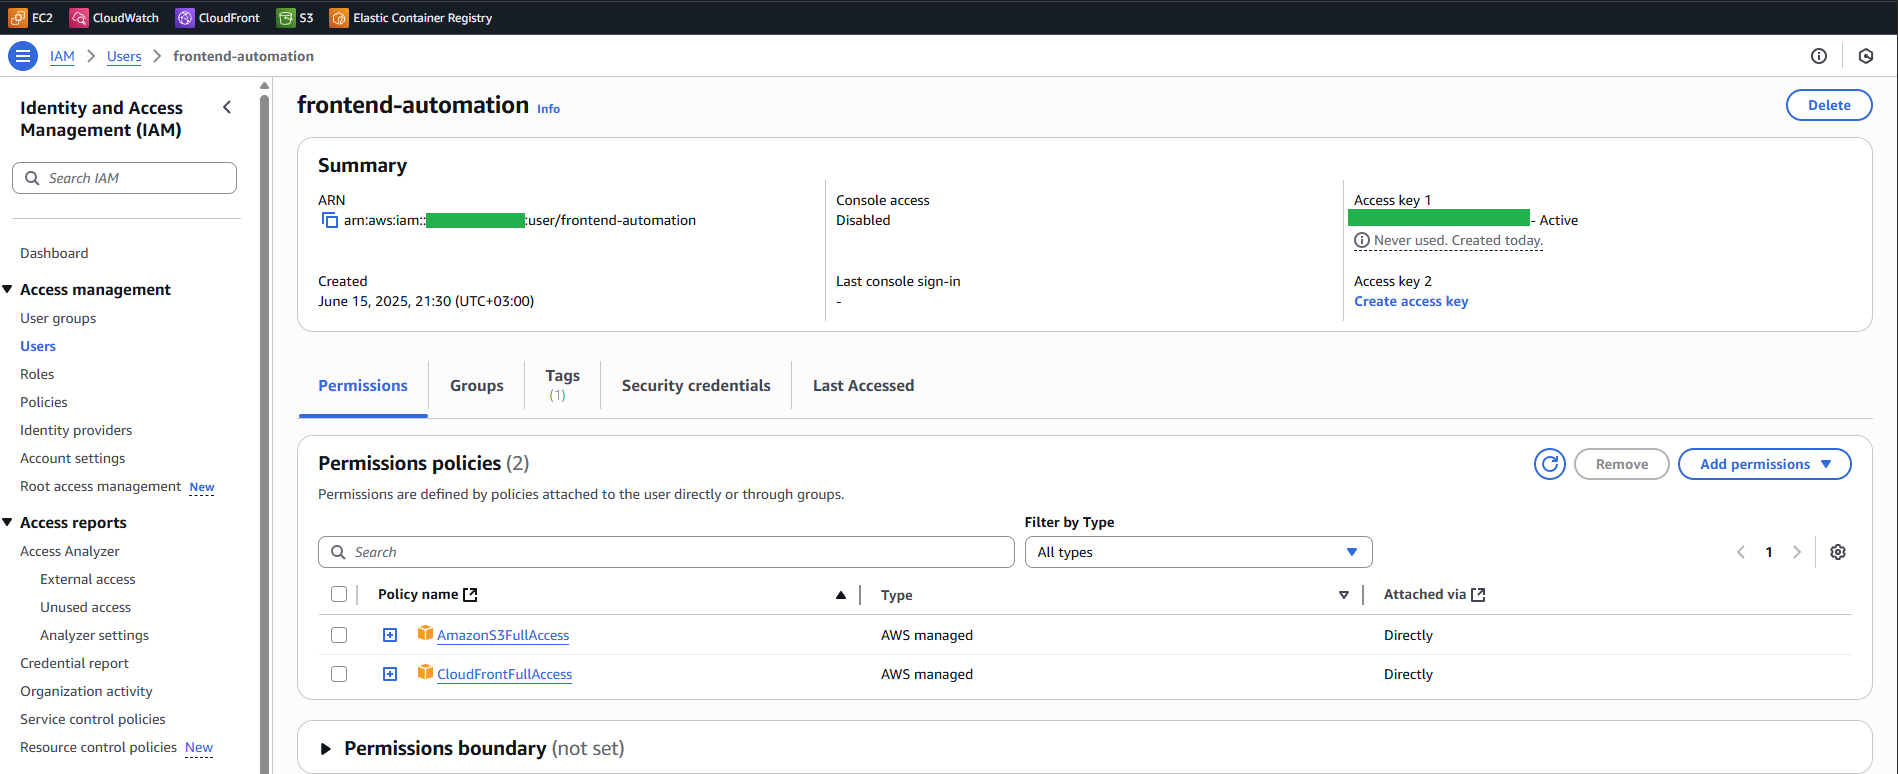
Configure IAM User
To create a User search for IAM then go to Users from Access management section and create user.
- Give it a name, eg:
frontend-automation Attach policies directlyand choose:CloudFrontFullAccessAmazonS3FullAccess
- Create Access Key
Here is the final configuration that you will have. For production setups, limit the IAM user’s access using the Principle of Least Privilege.
Deploying the App from DEV machine
If you are a solo dev, building a pet project, you can get away with these commands:
npm run build
aws configure
aws s3 sync out/ s3://$BUCKET_NAME/ --delete
aws cloudfront create-invalidation --distribution-id $DISTRIBUTION_ID --paths "/*"
Deploying the App from Github Actions
Go to the actions tab and create a new workflow. We need to add the following secrets (Settings -> Secrets and variables -> Actions):
- AWS_ACCESS_KEY_ID
- AWS_S3_BUCKET
- AWS_SECRET_ACCESS_KEY
- CLOUDFRONT_DISTRIBUTION_ID
Here is the code for the Github Action that is deploying the static content to AWS S3 Bucket, followed by a CloudFront cache invalidation to ensure that the users are receiving the latest content update.
I’ve split the workflow into three stages (jobs): build - nextjs generates the static pages, release - pushing into S3 and finally cache-invalidation - invalidate the CloudFront cache.
on:
  push:
    branches: ["master"]
  workflow_dispatch:

permissions:
    contents: read
    pages: write
    id-token: write
jobs:
    build:
      runs-on: ubuntu-latest
      outputs:
        runName: ${{ steps.setRunName.outputs.runName }}
      permissions:
        contents: read
        packages: write
      defaults:
        run:
          working-directory: ./
      steps:
        - name: Checkout code
          uses: actions/checkout@v3
        - name: Use Node.js 22
          uses: actions/setup-node@v4
          with:
            node-version: 22
        - name: npm install
          run: npm install
        - name: next build
          run: npx next build
        - name: 'Upload Artifact'
          uses: actions/upload-artifact@v4
          with:
            name: app
            path: ./out
            if-no-files-found: error
            retention-days: 1
    release:
      needs: build
      runs-on: ubuntu-latest
      environment: Production
      steps:
        - name: Download build artifact
          uses: actions/download-artifact@v4
          with:
            name: app
        - name: Show files
          run: ls
        - name: Deploy to S3
          uses: jakejarvis/s3-sync-action@master
          with:
            args: --delete
          env:
            AWS_S3_BUCKET: ${{ secrets.AWS_S3_BUCKET }}
            AWS_ACCESS_KEY_ID: ${{ secrets.AWS_ACCESS_KEY_ID }}
            AWS_SECRET_ACCESS_KEY: ${{ secrets.AWS_SECRET_ACCESS_KEY }}
            AWS_REGION: 'eu-central-1'
            SOURCE_DIR: '.'
    cache-invalidation:
      needs: release
      runs-on: ubuntu-latest
      environment: Production
      steps:
        - name: Invalidate CloudFront
          uses: chetan/invalidate-cloudfront-action@v2
          env:
            DISTRIBUTION: ${{ secrets.CLOUDFRONT_DISTRIBUTION_ID }}
            PATHS: "/*"
            AWS_REGION: "eu-central-1"
            AWS_ACCESS_KEY_ID: ${{ secrets.AWS_ACCESS_KEY_ID }}
            AWS_SECRET_ACCESS_KEY: ${{ secrets.AWS_SECRET_ACCESS_KEY }}
And there you have it! You’ve successfully built a robust, automated CI/CD pipeline for your Next.js static pages using GitHub Actions, AWS S3, and CloudFront. You’ve eliminated the manual steps of uploading files and invalidating the CloudFront distribution.
If you have a backend also can read further Deploy Docker compose to EC2.
If you have any questions or got stuck, reach out.